During my time at Midnight Society, I always found it difficult anticipating what my gunfire assets would sound like in-engine. This surprise factor mellowed over time but never fully subsided, and was an unwanted source of friction and unease in my weapon design process on the game. By modelling game-audio gunfire playback systems directly within REAPER, we can circumvent this blindside entirely and quicken the weapon design process in game audio.
I hadn't designed this template for game audio usage initially, this process and these effects were created while designing weapon mixes for Aftertouch Audio's Master Gun Library. (in the effort of reverse-engineering the stellar audio work of Modern Warfare 2019.) Although my time at Midnight Society may be over, I hope that this design process can double as a tool to smoothen game audio weapon design, and I'm really looking forward to its utility in future titles.
Before we start, there are a few devices required to follow along:
| DEVICE NAME | REPOSITORY TO IMPORT |
| MK SLICER | https://forum.cockos.com/showthread.php?t=232672 |
| PARANORMAL FX ROUTER | https://forum.cockos.com/showthread.php?t=283054 |
| ALEXGUNS MIDI PROCESSOR | reapack.alexsoundstuff.com |
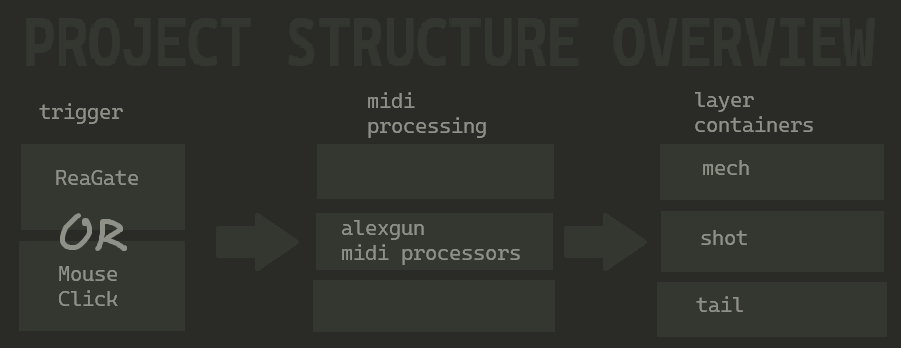
I thought it would be best to introduce this guide with broad look at the structure of this project: First we must create reliable 'trigger' events, and I settled on two methods: Reagate (we can use reagate's midi on/off message functionality. We'll set that up later), and my mouseclicker device (Which is also in the repository.) These will create midi messages which we can use to play our gunshot assets within samplers.
We cant just pipe the midi messages directly into the samplers, it would sound robotic - first we must process the midi messages. I have created one, condensed device in order to do this. It chooses a random gunshot within the container 'array', randomize that sampler's pitch bend, randomize the note's velocity, limit the 'concurrency' of the layer, and more. These are the same methods that game developers use to introduce on-the-fly variance in fps engines.
Finally, after we have processed the midi events, all that remains is ensuring the layer containers are set up correctly. If they are, either of the triggering methods will create a beautifully varied, dynamically layered gunshot sound that only this template can accomodate.
In practice, I've found it easiest to work backwards - I create the assets first, put them into their own containers, adjust the midi processors, and then set up the triggering.
STEP 1: CREATE YOUR ASSETS
The first step to getting started is designing your mech, shot, and tail assets, one after the other as subprojects. It's significant that we are designing each layer in their own subproject, as reasamplomatic6000 is able to load not just sound files, but subprojects - whenever we make changes to the subprojects we can simply refresh the project's references to hear the updated designed assets.
STEP 2: SLICE THE SUBPROJECTS
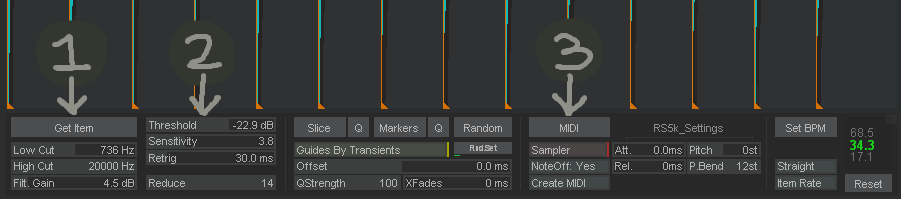
This is when NK Slicer comes in. Open NK Slicer, select one of the subprojects, and click on "Get Item." Adjust the threshold, sensitivity, and retrig sliders until you see one marker per gunshot. Lastly, click on "MIDI." You will see a new track appear with a midi clip appear - each note within the newly generated midi clip must correspond to each singular gunshot. Repeat for each layer until you have a midi clip for each of your subprojects.
STEP 3: CREATE YOUR GUN
This guide assumes that the reader is using paranormal FX router. Bring all of the generated MIDI containers over to a new track so that all of your layer containers are parallel, and place an ALEXGUNS MIDI PROCESSOR within each container. (midi processor needs to be before all the generated reasamplomatic6000 slices.)

STEP 4: CONFIGURE ALEXGUNS MIDI PROCESSOR
I have organized this midi processor to my best ability to make it intuitive, however there are many functions so this device does require some explanation. The midi processor is categorized into four groups of sliders which will be explained here one at a time
----INITIAL SETUP----
Global Seed: Sets the initial value for the global random number generator
OUTPUT LOWEST / HIGHEST: Defines the range of MIDI note #s that the randomized output notes will map to. Must match the container note range!
Concurrency limit: acts as a polyphony limit. If exceeded, the oldest active note is terminated (stolen) to make room for the new one.
----VELOCITY RANDOM CONTROLS----
Velocity Rand Amt controls the amount of variation in each note's velocity
Burst detection gap: Sets the duration (in seconds) of the internal timer used to detect continuous firing.
Burst Interpolation Time: Sets the time (in seconds) over which the velocity "ramps" from the initial (first shot) velocity to the FINAL VELOCITY target during a continuous burst.
----PITCH RANDOM CONTROLS----
The most intuitive part of this device. Use pitch rand amt to adjust the amount of pitch variation between shots, and pitch offset to simply pitch the gun layer up or down.
----VISUALIZERS----
These sliders display the current shot velocity, and the current burst detection timer status. Adjusting them doesn't do anything.
STEP 5: TRIGGER YOUR GUNFIRE
Finally, we can trigger the gunfire playback. At this point you should have a mech container, shot container, tail container, or however you like to layer your guns, each with their own configured midi processor and all of the respective layer slices. All that should be left to do is configure the trigger devices.
----MOUSECLICKER----
ALEXGUNS MOUSECLICKER is an all-in-one tool enabling generation of the midi shot events with the mouse button like in a game, with adjustible RPM. It's on the same reapack repository as the midi processor. All you have to do is load it in before the midi processors and you should be good to go.
----REAGATE----
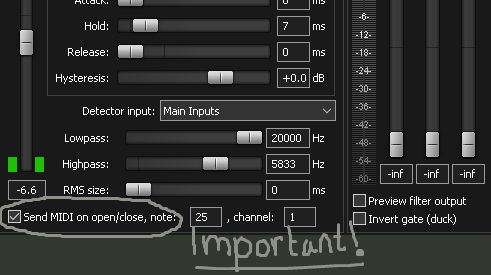
The important thing is to make sure that your ReaGate's threshold, release, and hold settings are configured so that the gate only activates once per shot, and that the midi functionality is enabled. With the gate, you will be able to turn any raw gunshot tracks into the layered designed mix (or any click track syncing however you want it to, I like using it in linear projects sometimes.)
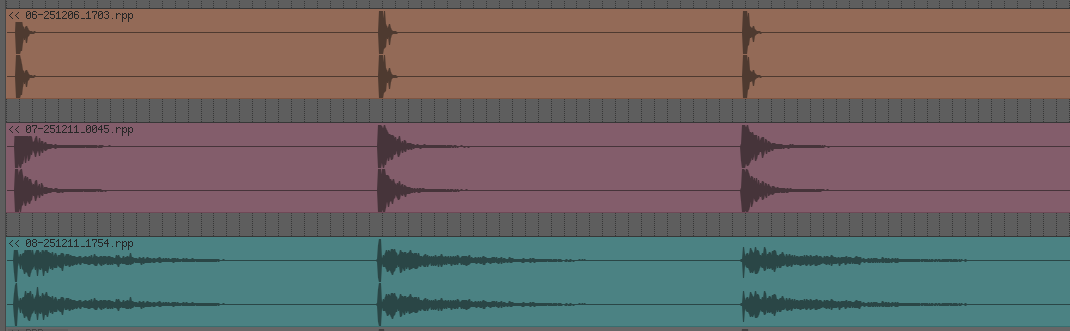
Here's a track template I've prepared for you to paste your slices into.
I apologize that I can't provide a more simple template workflow, I hope that after reading this guide, you see that the process of slicing the subprojects is important in order to get this project format working.
Hence the in-depth guide, haha.
That's about it! If you have any suggestions regarding article's clarity, want help with the setup, or would like me to be part of your project (or perhaps even a job? I am currently looking.) don't hesitate to reach out! Even if you would just like to share your experience using the setup, I would love to hear from you. You can reach out via the contact form below, or my email, which is [email protected]
Thanks again for reading, and enjoy using the template.